- Introduction
- 1. React Native Internals 📡
- 2. Setting up the project 🌈
- 3. See it in action! 🎬
- 4. Project Structure 🏢
- 5. Conventions and Code Style 🎓
- 6. Testing and Debugging 🚫🐞
- 7. Styling 💅🏻
- 8. Redux 🗄
- 9. Navigation 🚪
- 10. DevOps ⚙️
- 11. SVG Icons using react-native-vector-icons 🐾
- 12. Internationalization 🇮🇳🇺🇸🇷🇺
- 13. Custom Native Modules 🍮
- 14. References
- 15. The End
- Published with GitBook
Setting up Redux for React Native
Why Redux?
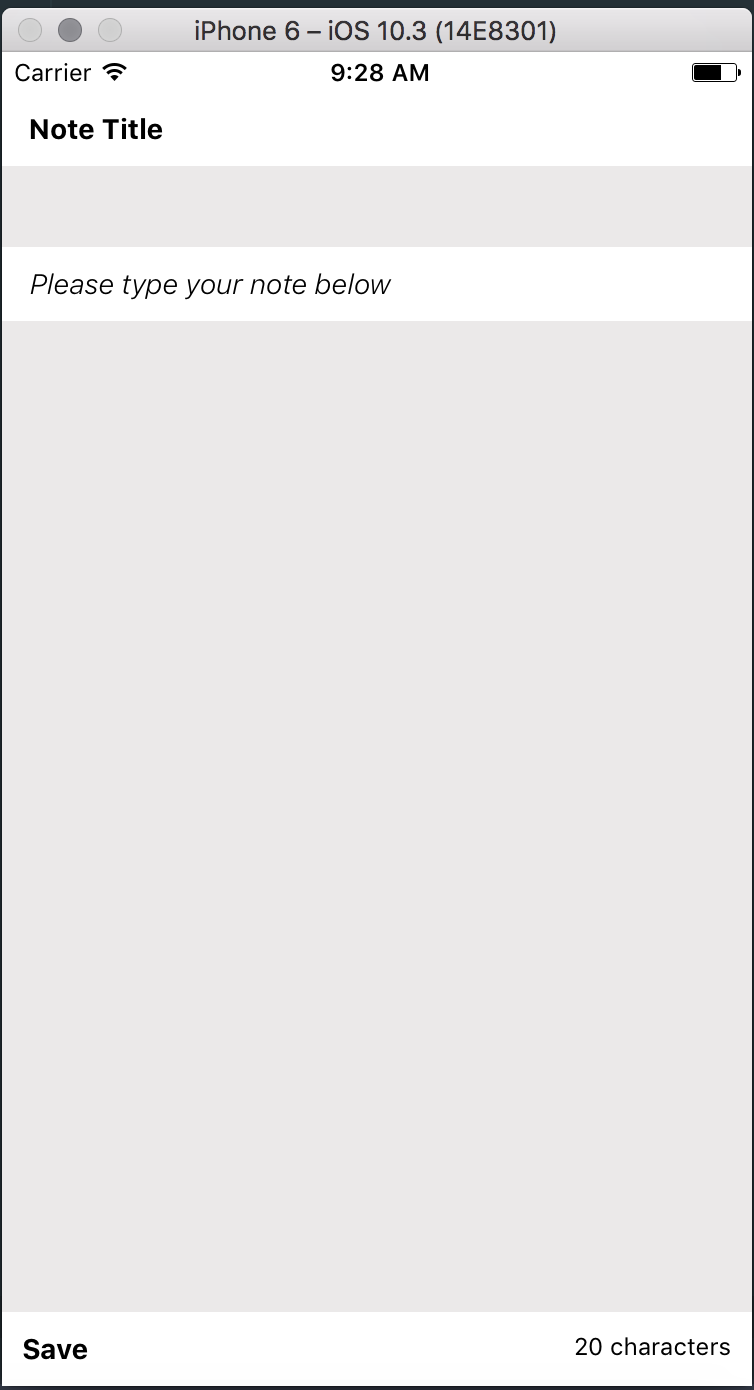
Let's say in our note-taker app, we need to add the character count and a save/sync button at the bottom of the screen. First, let's create the UI component for it.
Modify the files
app/components/Home/Home.component.js
...
...
...
           onChangeText={this.setTitle} value={this.state.title} />
         <Text style={styles.textAreaTitle}> Please type your note below </Text>
         <TextArea style={styles.textArea}/>
         <View style={styles.bottomBar}>
           <View style={styles.bottomBarWrapper}>
             <Text style={styles.saveBtn}>Save</Text>
             <Text style={styles.characterCount}>{20} characters</Text>
           </View>
         </View>
       </View>
     );
   }
app/components/Home/Home.component.style.js
 export default StyleSheet.create({
   container: {
     flex: 1,
     paddingTop: theme.CONTAINER_PADDING,
     flexDirection: 'column',
     justifyContent: 'space-between'
   },
   ...
   ...
   ...
   ...
   textArea: {
     ...textInput,
     flex: 1
   },
   bottomBar: {
     flexDirection: 'row',
     alignItems: 'center'
   },
   bottomBarWrapper: {
     flexDirection: 'row',
     justifyContent: 'space-between',
     flex: 1
   },
   saveBtn: {
     padding: 10,
     fontWeight: theme.FONT_WEIGHT_BOLD
   },
   characterCount: {
     padding: 10,
     fontSize: theme.FONT_SIZE_SMALL
   }
 });
app/styles/theme.style.js
   ...
   ...
   BACKGROUND_COLOR_LIGHT: '#ebe9e9',
   ...
   ...
 };
Now our app should have a bottom bar with a character count and a save button.
Currently, we have hardcoded the character count to 20.
But if you look at the app now, there is no way for us to get the character count from the TextArea component and use it as the text for the character count text view. To do this we will need to move the state present inside the TextArea component and place it in the Home component. This is because all the components that need access to a state have to be children of the component holding the state.
So we modify our components as follows:
app/components/TextArea/TextArea.component.js
import React, {Component} from 'react';
import {TextInput} from 'react-native';
import PropTypes from 'prop-types';
import styles from './TextArea.component.style';

class TextArea extends Component {
  static propTypes = {
    text: PropTypes.string,
    onTextChange: PropTypes.func
  }
  render () {
    const {text, onTextChange, ...extraProps} = this.props;
    return (
      <TextInput
        {...extraProps}
        style={[styles.textArea, extraProps.style]}
        multiline = {true}
        onChangeText={onTextChange}
        value={text}
      />
    );
  }
}
export default TextArea;
app/components/Home/Home.component.js
import React, {Component} from 'react';
import {View, Text, TextInput} from 'react-native';
import styles from './Home.component.style';
import TextArea from '../TextArea/TextArea.component';

class Home extends Component {
  state = {
    title: '',
    text: ''
  }
  setTitle = (title) => this.setState({title})
  setText = (text) => this.setState({text});
  render () {
    return (
      <View style={styles.container}>
        <Text style={styles.titleHeading}> Note Title</Text>
        <TextInput style={styles.titleTextInput}
            onChangeText={this.setTitle} value={this.state.title} />
        <Text style={styles.textAreaTitle}> Please type your note below </Text>
        <TextArea text={this.state.text} onTextChange={this.setText} style={styles.textArea}/>
        <View style={styles.bottomBar}>
          <View style={styles.bottomBarWrapper}>
            <Text style={styles.saveBtn}>Save</Text>
            <Text style={styles.characterCount}>{this.state.text.length} characters</Text>
          </View>
        </View>
      </View>
    );
  }
}
export default Home;
The character count should now update whenever you enter text on the text field.

By moving the state from the child component to the parent, we were able to access it in multiple children components.
Therefore, to provide access to the data that needs to be accessed by multiple components, we need to have the state in the enclosing parent component. Following this principle, if we keep on moving the state to the parent component, we will end up with the state in the topmost level component.
Redux builds on top of similar principles. It keeps a global store to which the components which need access to the data can subscribe. Additionally, it provides a mechanism by which these components can re-render whenever the data in the store changes.
Now, since we understand how Redux is helpful, let's setup Redux for our app.
Setup
Let's begin by installing a few packages.
yarn add redux react-redux redux-promise redux-thunk
or
npm install --save redux react-redux
- redux - the main Redux library.
- react-redux - the React bindings for Redux, which makes our life easy when using Redux with React.
Additionally, you can also install your preferred Redux middleware like redux-thunk, etc. The comments on the code specify how to do that.
Now create the files
app/redux/store.js
import {createStore, compose/* , applyMiddleware*/} from 'redux';
// import someReduxMiddleware from 'some-redux-middleware';
// import someOtherReduxMiddleware from 'some-other-redux-middleware';
import rootReducer from './reducers/root.reducer';

const enhancerList = [];
const devToolsExtension = window && window.__REDUX_DEVTOOLS_EXTENSION__;

if (typeof devToolsExtension === 'function') {
  enhancerList.push(devToolsExtension());
}

const composedEnhancer = compose(/* applyMiddleware(someReduxMiddleware, someOtherReduxMiddleware),*/ ...enhancerList);

const initStore = () => createStore(rootReducer, {}, composedEnhancer);

module.exports = {
  initStore
};
app/redux/reducers/root.reducer.js
import {combineReducers} from 'redux';

export default combineReducers({

});
Now, let's add our first reducer and action.
Create the files:
app/redux/actions/index.actions.js
This file will contain all our actions.
export const TEST_ACTION = 'TEST_ACTION';
app/redux/reducers/test.reducer.js
import {TEST_ACTION} from '../actions/index.actions';

const test = (state = {}, action) => {
  switch (action.type) {
  case TEST_ACTION: {
    return action.payload;
  }
  default:
    return state;
  }
};

export default test;
Now let's add our test reducer to the root reducer.
Modify
app/redux/reducers/root.reducer.js
import {combineReducers} from 'redux';
import test from './test.reducer';

export default combineReducers({
  test
});
Now let's initialize the store.
Modify the file:
app/index.js
import React, {Component} from 'react';
import {initStore} from './redux/store';
import {Provider} from 'react-redux';

import App from './App.container';

const store = initStore();

class NoteTaker extends Component {
  render () {
    return (
      <Provider store={store}>
        <App />
      </Provider>
    );
  }
}

export default NoteTaker;
and move the initialization of the home component to another file.
app/App.container.js
import React, {Component} from 'react';
import Home from './components/Home/Home.component';
import {connect} from 'react-redux';

class App extends Component {
  render () {
    console.log(this.props.state); // eslint-disable-line
    return (
      <Home />
    );
  }
}

const mapStateToProps = (state) => ({
  state
});

const mapDispatchToProps = (dispatch) => ({
  dispatch
});

export default connect(mapStateToProps, mapDispatchToProps)(App);
At this point, we should a have a Redux store with an initial test state from the test reducer.
To check this, let's run our app on the simulator.
Now open up the debug menu on the iOS simulator by pressing cmd+ctrl+z or on Android emulator by using cmd+m.
Choose Debug JS Remotely.
This should run the app JS code in react-native-debugger and if all goes well we should see something like this on the console panel:
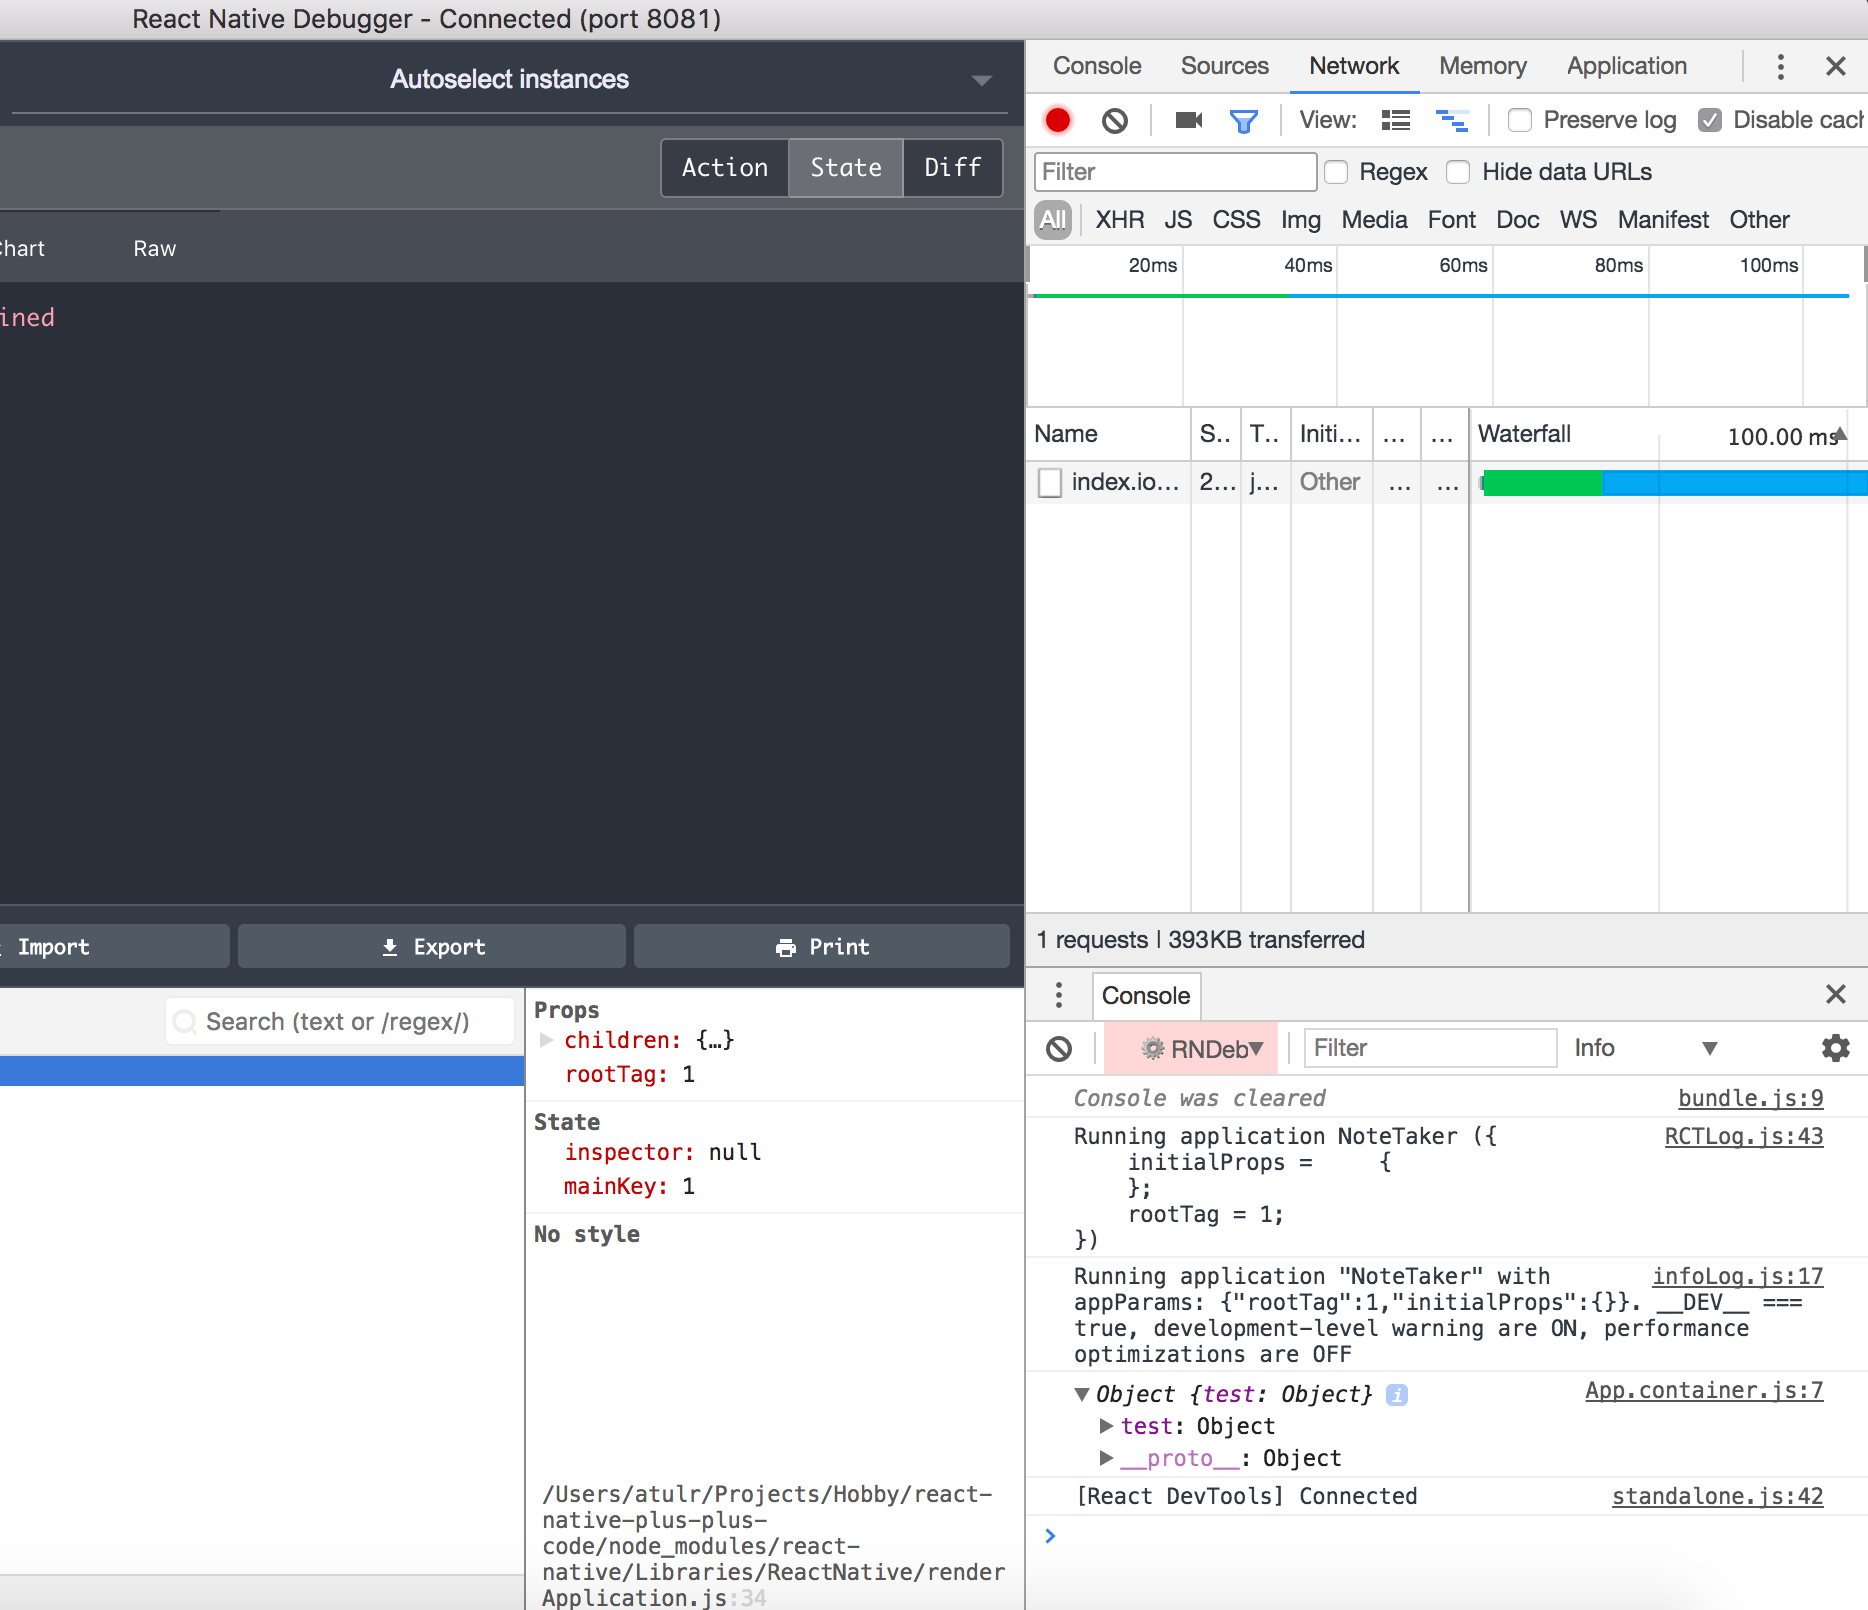
This implies that our Redux store is successfully initialized with the test reducer.
NOTE: If your tests fail due to the error window not defined, then add a mock file
__mocks__/react-native.js
var rn = require('react-native');
global.window = global;
module.exports = rn;
This will initialize a dummy window variable when tests are run in node environment.

The code till here can be found on the branch chapter/9/9.1